Recurrent Neural Network Tutorial, Part 4 – Implementing a GRU and LSTM RNN with Python and Theano
The code for this post is on Github. This is part 4, the last part of the Recurrent Neural Network Tutorial. The previous parts are:
- Recurrent Neural Networks Tutorial, Part 1 – Introduction to RNNs
- Recurrent Neural Networks Tutorial, Part 2 – Implementing a RNN with Python, Numpy and Theano
- Recurrent Neural Networks Tutorial, Part 3 – Backpropagation Through Time and Vanishing Gradients
In this post we’ll learn about LSTM (Long Short Term Memory) networks and GRUs (Gated Recurrent Units). LSTMs were first proposed in 1997 by Sepp Hochreiter and Jürgen Schmidhuber, and are among the most widely used models in Deep Learning for NLP today. GRUs, first used in 2014, are a simpler variant of LSTMs that share many of the same properties. Let’s start by looking at LSTMs, and then we’ll see how GRUs are different.
LSTM networks #
In part 3 we looked at how the vanishing gradient problem prevents standard RNNs from learning long-term dependencies. LSTMs were designed to combat vanishing gradients through a gating mechanism. To understand what this means, let’s look at how a LSTM calculates a hidden state \(s_t\) (I’m using \(\circ\) to mean elementwise multiplication):
$$ \begin{aligned} i &=\sigma(x_tU^i + s_{t-1} W^i) \\ f &=\sigma(x_t U^f +s_{t-1} W^f) \\ o &=\sigma(x_t U^o + s_{t-1} W^o) \\ g &=\ tanh(x_t U^g + s_{t-1}W^g) \\ c_t &= c_{t-1} \circ f + g \circ i \\ s_t &=\tanh(c_t) \circ o \end{aligned} $$
These equations look quite complicated, but they are not that difficult to understand if you spend a few minutes looking at them. First, notice that a LSTM layer is just another way to compute a hidden state. Previously, we computed the hidden state as \(s_t = \tanh(Ux_t + Ws_{t-1})\). The inputs to this unit were \(x_t\), the current input at step \(t\), and \(s_{t-1}\), the previous hidden state. The output was a new hidden state \(s_t\). A LSTM unit does the exact same thing, just in a different way! This is key to understanding the big picture. You can essentially treat LSTM (and GRU) units as a black boxes. Given the current input and previous hidden state, they compute the next hidden state in some way.

With that in mind let’s try to get an intuition for how a LSTM unit computes the hidden state. Chris Olah has an excellent post that goes into details on this and to avoid duplicating his effort I will only give a brief explanation here. I urge you to read his post to for deeper insight and nice visualizations. But, to summarize:
- \(i, f, o\) are called the input, forget and output gates, respectively. Note that they have the exact same equations, just with different parameter matrices. They care called gates because the sigmoid function squashes the values of these vectors between 0 and 1, and by multiplying them elementwise with another vector you define how much of that other vector you want to “let through”. The input gate defines how much of the newly computed state for the current input you want to let through. The forget gate defines how much of the previous state you want to let through. Finally, The output gate defines how much of the internal state you want to expose to the external network (higher layers and the next time step). All the gates have the same dimensions \(d_s\), the size of your hidden state.
- \(g\) is a “candidate” hidden state that is computed based on the current input and the previous hidden state. It is exactly the same equation we had in our vanilla RNN, we just renamed the parameters \(U\) and \(W\) to \(U^g\) and \(W^g\). However, instead of taking \(g\) as the new hidden state as we did in the RNN, we will use the input gate from above to pick some of it.
- \(c_t\) is the internal memory of the unit. It is a combination of the previous memory \(c_{t-1}\) multiplied by the forget gate, and the newly computed hidden state \(g\), multiplied by the input gate. Thus, intuitively it is a combination of how we want to combine previous memory and the new input. We could choose to ignore the old memory completely (forget gate all 0’s) or ignore the newly computed state completely (input gate all 0’s), but most likely we want something in between these two extremes.
- Given the memory \(c_t\), we finally compute the output hidden state \(s_t\) by multiplying the memory with the output gate. Not all of the internal memory may be relevant to the hidden state used by other units in the network.
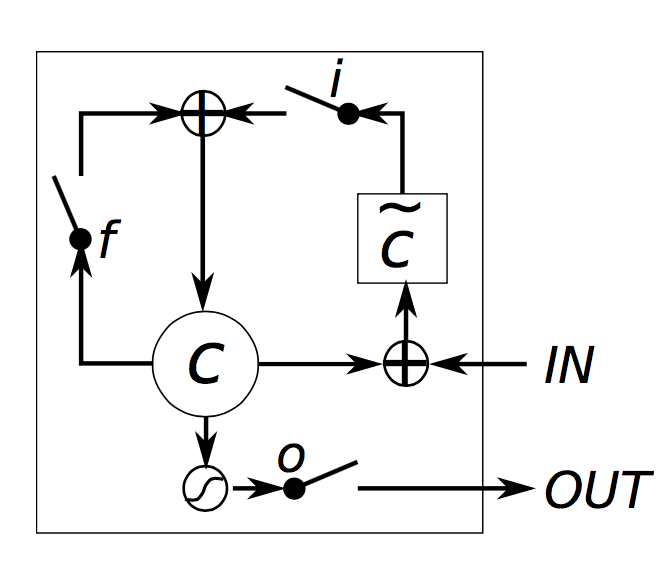
Intuitively, plain RNNs could be considered a special case of LSTMs. If you fix the input gate all 1’s, the forget gate to all 0’s (you always forget the previous memory) and the output gate to all one’s (you expose the whole memory) you almost get standard RNN. There’s just an additional \(\tanh\) that squashes the output a bit. The gating mechanism is what allows LSTMs to explicitly model long-term dependencies. By learning the parameters for its gates, the network learns how its memory should behave.
Notably, there exist several variations on the basic LSTM architecture. A common one is creating peephole connections that allow the gates to not only depend on the previous hidden state \(s_{t-1}\), but also on the previous internal state \(c_{t-1}\), adding an additional term in the gate equations. There are many more variations. LSTM: A Search Space Odyssey empirically evaluates different LSTM architectures.
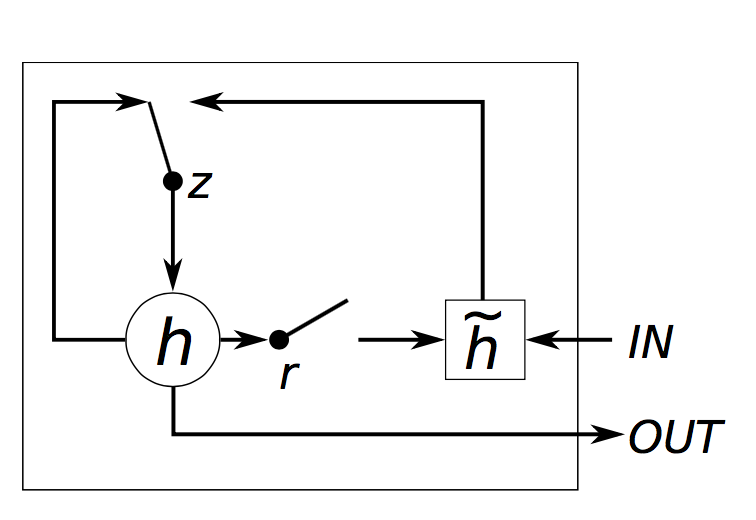
GRUs #
The idea behind a GRU layer is quite similar to that of a LSTM layer, as are the equations.
$$ \begin{aligned} z &=\sigma(x_tU^z + s_{t-1} W^z) \\ r &=\sigma(x_t U^r +s_{t-1} W^r) \\ h &= tanh(x_t U^h + (s_{t-1} \circ r) W^h) \\ s_t &= (1 - z) \circ h + z \circ s_{t-1} \end{aligned} $$
A GRU has two gates, a reset gate \(r\), and an update gate \(z\). Intuitively, the reset gate determines how to combine the new input with the previous memory, and the update gate defines how much of the previous memory to keep around. If we set the reset to all 1’s and update gate to all 0’s we again arrive at our plain RNN model. The basic idea of using a gating mechanism to learn long-term dependencies is the same as in a LSTM, but there are a few key differences:
- A GRU has two gates, an LSTM has three gates.
- GRUs don’t possess and internal memory (\(c_t\)) that is different from the exposed hidden state. They don’t have the output gate that is present in LSTMs.
- The input and forget gates are coupled by an update gate \(z\) and the reset gate \(r\) is applied directly to the previous hidden state. Thus, the responsibility of the reset gate in a LSTM is really split up into both \(r\) and \(z\).
- We don’t apply a second nonlinearity when computing the output.
GRU vs LSTM #
Now that you’ve seen two models to combat the vanishing gradient problem you may be wondering: Which one to use? GRUs are quite new (2014), and their tradeoffs haven’t been fully explored yet. According to empirical evaluations in Empirical Evaluation of Gated Recurrent Neural Networks on Sequence Modeling and An Empirical Exploration of Recurrent Network Architectures, there isn’t a clear winner. In many tasks both architectures yield comparable performance and tuning hyperparameters like layer size is probably more important than picking the ideal architecture. GRUs have fewer parameters (U and W are smaller) and thus may train a bit faster or need less data to generalize. On the other hand, if you have enough data, the greater expressive power of LSTMs may lead to better results.
Implementation #
Let’s return to the implementation of the Language Model from part 2 and let’s use GRU units in our RNN. There is no principled reason why I’ve chosen GRUs instead LSTMs in this part (other that I also wanted to become more familiar with GRUs). Their implementations are almost identical so you should be able to modify the code to go from GRU to LSTM quite easily by changing the equations.
We base the code on our previous Theano implementation. Remember that a GRU (LSTM) layer is just another way of computing the hidden state. So all we really need to do is change the hidden state computation in our forward propagation function.
def forward_prop_step(x_t, s_t1_prev):
      # This is how we calculated the hidden state in a simple RNN. No longer!
      # s_t = T.tanh(U[:,x_t] + W.dot(s_t1_prev))

      # Get the word vector
      x_e = E[:,x_t]

      # GRU Layer
      z_t1 = T.nnet.hard_sigmoid(U[0].dot(x_e) + W[0].dot(s_t1_prev) + b[0])
      r_t1 = T.nnet.hard_sigmoid(U[1].dot(x_e) + W[1].dot(s_t1_prev) + b[1])
      c_t1 = T.tanh(U[2].dot(x_e) + W[2].dot(s_t1_prev * r_t1) + b[2])
      s_t1 = (T.ones_like(z_t1) - z_t1) * c_t1 + z_t1 * s_t1_prev

      # Final output calculation
      # Theano's softmax returns a matrix with one row, we only need the row
      o_t = T.nnet.softmax(V.dot(s_t1) + c)[0]

      return [o_t, s_t1]
In our implementation we also added bias units \(b, c\). It’s quite typical that these are not shown in the equations. Of course we also need to change the initialization of our parameters \(U\) and \(W\) because they now have a different sizes. I don’t show the initialization code here, but it is on Gitub. I also added a word embedding layer \(E\), but more on that below.
But what about the gradients? We could derive the gradients for \(E, W, U, b\) and \(c\) by hand using the chain rule, just like we did before. But in practice most people use libraries like Theano that support auto-differenation of expressions. If you are for somehow forced to calculate the gradients yourself, you probably want to modularize different units and have your own version of auto-differentiation using the chain rule. We let Theano calculate the gradients for us:
# Gradients using Theano
dE = T.grad(cost, E)
dU = T.grad(cost, U)
dW = T.grad(cost, W)
db = T.grad(cost, b)
dV = T.grad(cost, V)
dc = T.grad(cost, c)
That’s pretty much it.
Additional improvements #
Using rmsprop for parameter updates #
In part 2 we used the most basic version of Stochastic Gradient Descent (SGD) to update our parameters. It turns out this isn’t such a great idea. If you set your learning rate low enough, SGD is guaranteed to make progress towards a good solution, but in practice that would take a very long time. There exist a number of commonly used variations on SGD, including the (Nesterov) Momentum Method, AdaGrad, AdaDelta and rmsprop. This post contains a good overview of many of these methods. I’m also planning to explore the implementation of each of these methods in detail in a future post. For this part of the tutorial I chose to go with rmsprop. The basic idea behind rmsprop is to adjust the learning rate per-parameter according to the a smoothed sum of the previous gradients. Intuitively this means that frequently occurring features get a smaller learning rate because the sum of their gradients is larger, and rare features get a larger learning rate.
The implementation of rmsprop is quite simple. For each parameter we keep a cache variable and during gradient descent we update the parameter and the cache as follows. For example, for \(W\):
cacheW = decay * cacheW + (1 - decay) * dW ** 2
W = W - learning_rate * dW / np.sqrt(cacheW + 1e-6)
The decay is often set to 0.9 or 0.95 and the 1e-6 term is added to avoid division by 0.
Adding an embedding layer #
Using word embeddings such as word2vec and GloVe is a popular method to improve the accuracy of your model. Instead of using one-hot vectors to represent our words, the low-dimensional vectors learned using word2vec or GloVe carry semantic meaning – similar words have similar vectors. Using these vectors is a form of pre-training. Intuitively, you are telling the network which words are similar so that it needs to learn less about the language. Using pre-trained vectors is particularly useful if you don’t have a lot of data because it allows the network to generalize to unseen words. I didn’t use pre-trained word vectors in my experiments, but adding an embedding layer (the matrix \(E\) in our code) makes it easy to plug them in. The embedding matrix is really just a lookup table – the ith column vector corresponds to the ith word in our vocabulary. By updating the matrix \(E\) we are learning word vectors ourselves, but they are very specific to our task (and data set) and not as general as those that you can download, which are trained on millions or billions of documents.
Adding a second GRU layer #
Adding a second layer to our network allows our model to capture higher-level interactions. You could add additional layers, but I didn’t try that for this experiment. You’ll likely see diminishing returns after 2-3 layers and unless you have a huge amount of data (which we don’t) more layers are unlikely to make a big difference and may lead to overfitting.

Adding a second layer to our network is straightforward, we (again) only need to modify the forward propagation calculation and initialization function.
# GRU Layer 1
z_t1 = T.nnet.hard_sigmoid(U[0].dot(x_e) + W[0].dot(s_t1_prev) + b[0])
r_t1 = T.nnet.hard_sigmoid(U[1].dot(x_e) + W[1].dot(s_t1_prev) + b[1])
c_t1 = T.tanh(U[2].dot(x_e) + W[2].dot(s_t1_prev * r_t1) + b[2])
s_t1 = (T.ones_like(z_t1) - z_t1) * c_t1 + z_t1 * s_t1_prev

# GRU Layer 2
z_t2 = T.nnet.hard_sigmoid(U[3].dot(s_t1) + W[3].dot(s_t2_prev) + b[3])
r_t2 = T.nnet.hard_sigmoid(U[4].dot(s_t1) + W[4].dot(s_t2_prev) + b[4])
c_t2 = T.tanh(U[5].dot(s_t1) + W[5].dot(s_t2_prev * r_t2) + b[5])
s_t2 = (T.ones_like(z_t2) - z_t2) * c_t2 + z_t2 * s_t2_prev
The full code for the GRU network is available here.
A note on performance #
I’ve gotten questions about this in the past, so I want to clarify that the code I showed here isn’t very efficient. It’s optimized for clarity and was primarily written for educational purposes. It’s probably good enough to play around with the model, but you should not use it in production or expect to train on a large dataset with it. There are many tricks to optimize RNN performance, but the perhaps most important one would be to batch together your updates. Instead of learning from one sentence at a time, you want to group sentences of the same length (or even pad all sentences to have the same length) and then perform large matrix multiplications and sum up gradients for the whole batch. That’s because such large matrix multiplications are efficiently handled by a GPU. By not doing this we can get little speed-up from using a GPU and training can be extremely slow.
So, if you want to train a large model I highly recommended using one of the existing Deep Learning libraries that are optimized for performance. A model that would take days/weeks to train with the above code will only take a few hours with these libraries. I personally like Keras, which is quite simple to use and comes with good examples for RNNs.
Results #
To spare you the pain of training a model over many days I trained a model very similar to that in part 2. I used a vocabulary size of 8000, mapped words into 48-dimensional vectors, and used two 128-dimensional GRU layers. The Jupyter notebook contains code to load the model so you can play with it, modify it, and use it to generate text.
Here are a few good examples of the network output (capitalization added by me).
- I am a bot , and this action was performed automatically .
- I enforce myself ridiculously well enough to just youtube.
- I’ve got a good rhythm going !
- There is no problem here, but at least still wave !
- It depends on how plausible my judgement is .
- ( with the constitution which makes it impossible )
It is interesting to look at the semantic dependencies of these sentences over multiple time steps. For example, bot and automatically are clearly related, as are the opening and closing brackets. Our network was able to learn that, pretty cool!